Layering Stencils| Totally Techniques
Creating layers with stencils and ink
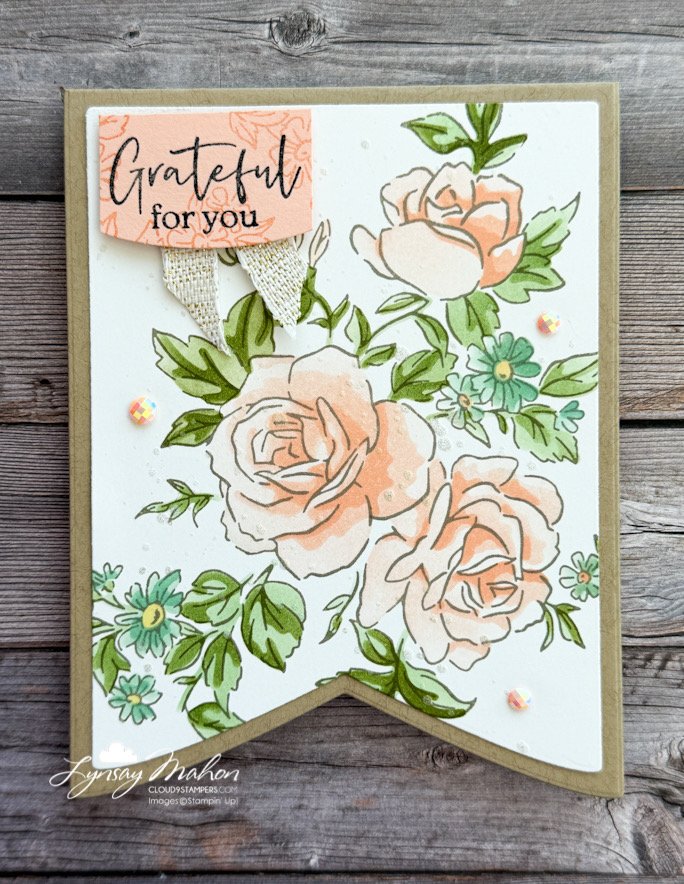
Hello my crafty friends! I'm Lynsay Mahon. I love when we can create depth and dimension on paper using ink! Check out this “layering stencils” technique!

Welcome to this month's Totally Techniques Blog Hop. Each month, our team shares hand-picked techniques and projects to help you make your next paper-crafted project. Each of our designers shares a handmade creation featuring the technique, along with ideas to inspire you! Today, we're diving deep into an easy, yet extremely effective technique: layering stencils
When You Want a Wow Project…
If you love depth in your images without having to colour, you’ll LOVE this stencil technique!
Double Embossing adds EXTRA texture.
What is Layering Stencils?
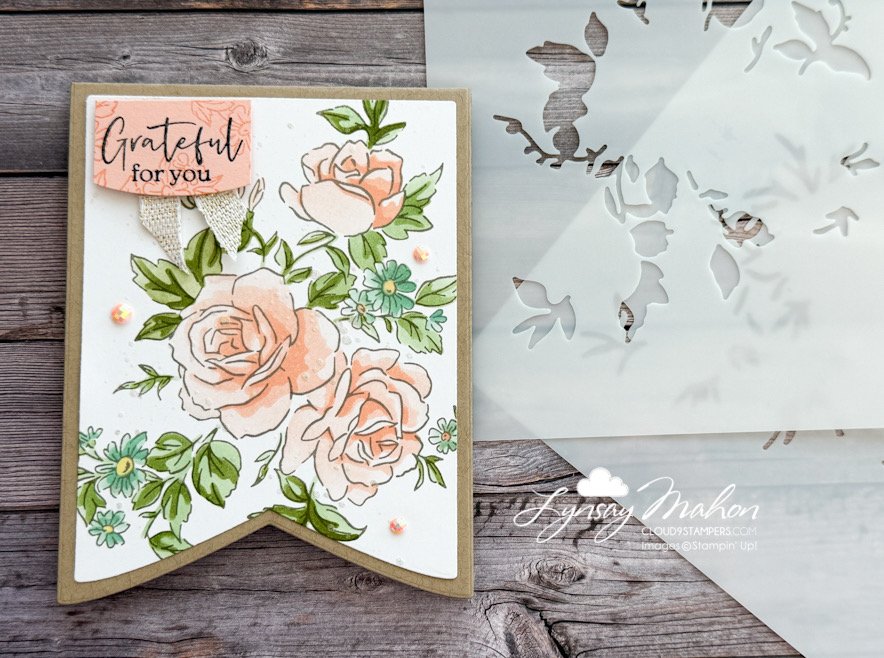
For this technique, you’ll need a mask that has images that are meant to build upon each other. Stampin’ Up! has an incredible stamp and mask combo called “Layers of Beauty” that I highly recommend for this. The idea is to continue adding layers of ink to be able to build the scene. You can create your own masks to try this technique at home using dies and punches.
Here’s How You Can Achieve the Layering Stencils Technique:
Stamp the Layers of Beauty flowers onto Basic White Cardstock
Start with the bolder of the flower masks and add Petal Pink Ink with a Blending Brush.
Keep adding ink using the coordinating masks until you get the completed look.
Repeat with the leaves masks using Old Olive Ink.
PRO TIP: Start light and add more pressure and ink as you build to the most detailed mask. You can always add ink, but you can’t take away.
Layering Stencils
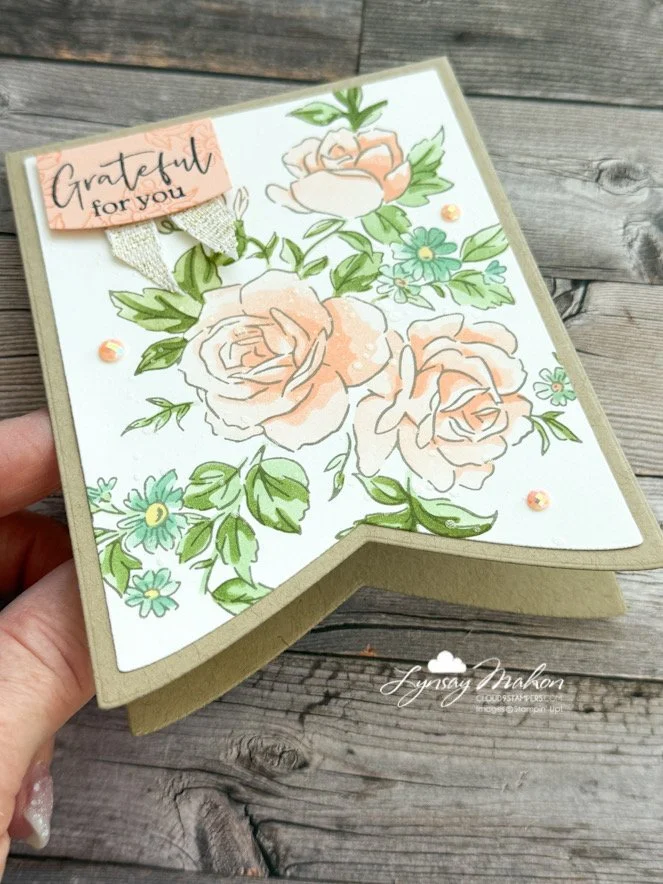
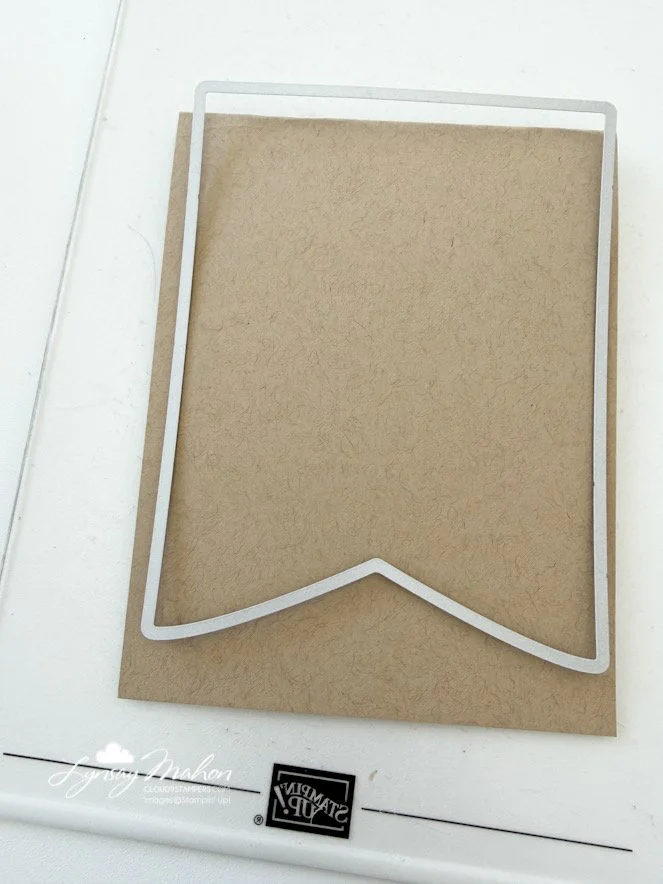
For the card base, I used the Party Banner Dies to create the shape. To achieve this, fold a 4-1/4” x 11” piece of cardstock in half. Run through the Stampin’ Cut & Emboss Machine with the seam of the card below the die. This will ensure it doesn’t cut through.
Be sure to hop along with the rest of the Totally Techniques Blog Hop team and see what the crew designed!
Have you worked with stencils before? Try out the layering stencils and let me know what you think in the comments!
Now hop along and see what the other talented creators have done with this technique — there are so many great ideas with this technique!
Happy stamping 💕
Lynsay
![Layers Of Beauty Bundle (English) [ 163519 ]](https://assets1.tamsnetwork.com/images/EC042017NF/163519s.jpg "Layers Of Beauty Bundle (English) [ 163519 ]") | ![Blending Brushes [ 153611 ]](https://assets1.tamsnetwork.com/images/EC042017NF/153611s.jpg "Blending Brushes [ 153611 ]") | ![Gray Granite Classic Stampin' Pad [ 147118 ]](https://assets1.tamsnetwork.com/images/EC042017NF/147118s.jpg "Gray Granite Classic Stampin' Pad [ 147118 ]") | ![Pool Party Classic Stampin' Pad [ 147107 ]](https://assets1.tamsnetwork.com/images/EC042017NF/147107s.jpg "Pool Party Classic Stampin' Pad [ 147107 ]") |
![Petal Pink Classic Stampin' Pad [ 147108 ]](https://assets1.tamsnetwork.com/images/EC042017NF/147108s.jpg "Petal Pink Classic Stampin' Pad [ 147108 ]") | ![Lemon Lolly Classic Stampin' Pad [ 161666 ]](https://assets1.tamsnetwork.com/images/EC042017NF/161666s.jpg "Lemon Lolly Classic Stampin' Pad [ 161666 ]") | ![Old Olive Classic Stampin' Pad [ 147090 ]](https://assets1.tamsnetwork.com/images/EC042017NF/147090s.jpg "Old Olive Classic Stampin' Pad [ 147090 ]") | ![Clear Wink Of Stella Glitter Brush [ 141897 ]](https://assets1.tamsnetwork.com/images/EC042017NF/141897s.jpg "Clear Wink Of Stella Glitter Brush [ 141897 ]") |
![Party Banners Dies [ 165264 ]](https://assets1.tamsnetwork.com/images/EC042017NF/165264s.jpg "Party Banners Dies [ 165264 ]") | ![Stampin' Cut & Emboss Machine [ 149653 ]](https://assets1.tamsnetwork.com/images/EC042017NF/149653s.jpg "Stampin' Cut & Emboss Machine [ 149653 ]") | ![Crumb Cake 8-1/2" X 11" Cardstock [ 120953 ]](https://assets1.tamsnetwork.com/images/EC042017NF/120953s.jpg "Crumb Cake 8-1/2\" X 11\" Cardstock [ 120953 ]") | ![Petal Pink 8-1/2" X 11" Cardstock [ 146985 ]](https://assets1.tamsnetwork.com/images/EC042017NF/146985s.jpg "Petal Pink 8-1/2\" X 11\" Cardstock [ 146985 ]") |