Background Magic With Triple Stamping | Totally Techniques
One stamp set. Three layers. Endless possibilities! Learn how easy it is to master the Triple Stamping Technique.
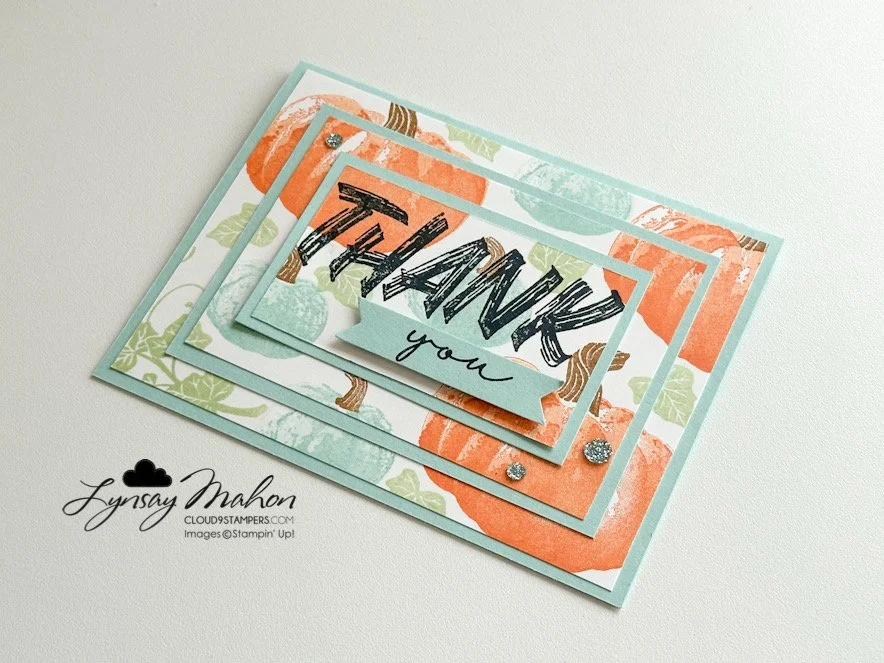
Hello my crafty friends! I'm Lynsay Mahon. I love a technique that has people saying, “wow! How did you do that?” The Triple Stamping Technique is that technique! It appears complicated, but is very easy and duplicatable!

Welcome to this month's Totally Techniques Blog Hop. Each month, our team shares hand-picked techniques and projects to help you make your next paper-crafted project. Each of our designers shares a handmade creation featuring the technique, along with ideas to inspire you! Today, we're diving deep into the Triple Stamping Technique that is going to have you reaching for all of your favourite stamp sets.
Here’s where the magic happens!
This month’s technique features your stamps and ink at the forefront of your project. This is a great time to pull out stamp sets and your favourite colours (three inks is a good place to start).
Before we jump into the how-to, let me explain why this paper crafting technique is something you’ll want to try:
It looks impressive but it is actually easy to do - no advanced skills or tools required!
You can use any stamp set you already own - whether your in the mood for crafting holiday, birthday or thank you, this technique works well with any stamp set!
It adds instant depth and dimension - with just three layers of cardstock, your stamped images come to life, creating a polished look in no time.
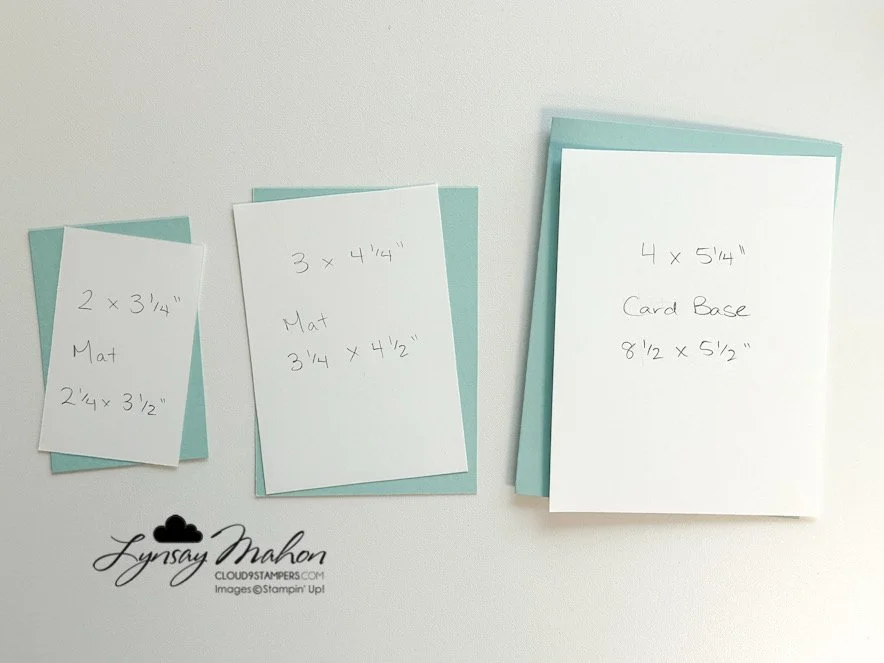
You can work with any three sizes of layers for the Triple Stamping Technique. These are what I used on this project.
The Supply List (You Probably Have Everything Already!)
Water-based ink pads (Stampin’ Up!’s Classic ink pads are perfect for this.)
A stamp set of your choice
Basic White Cardstock and a coloured cardstock (I used Pool Party… of course!)
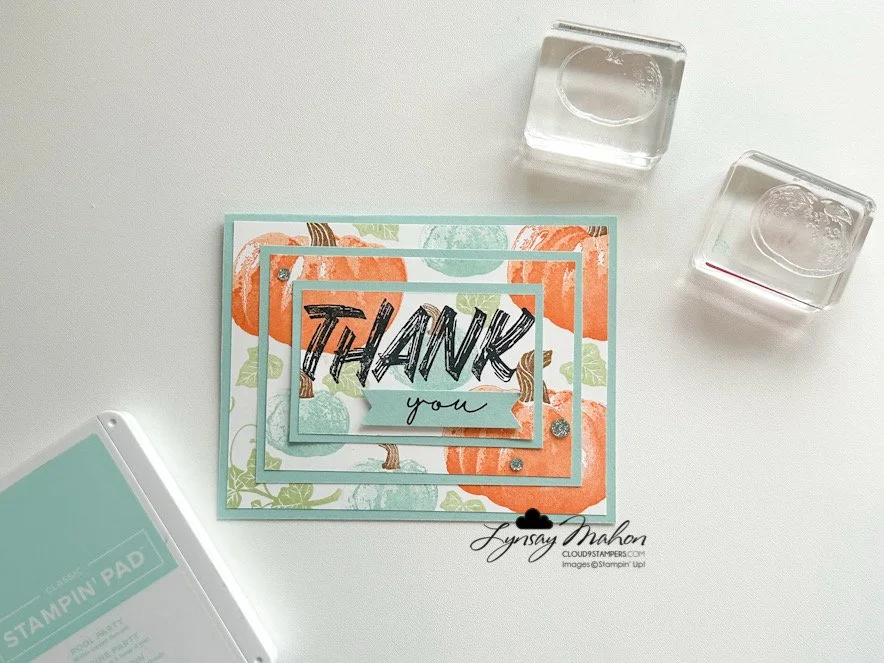
Triple Stamping Technique using the Beautiful Pumpkins Bundle
The Step-By-Step Triple Stamping Technique:
(as shown on my card example)
Here's how to master this paper crafting technique:
Step 1: Cut Your Three Layers and Mats to Size
Cut 3 pieces of Whisper White Cardstock:
2” x 3-1/4”
3” x 4-1/4”
4” x 5-1/4”
Cut 3 pieces of Pool Party Cardstock:
2-1/4” x 3-1/2”
3-1/4” x 4-1/2”
8-1/2” x 5-1/2”
Step 2: Layer Your Cardstock and Stamp
Layer your cardstock from largest to smallest. Be sure to line it up exactly as you want to see the finished layers using a small amount of adhesive to keep it in place. Ink and stamp the images. I chose to do it in a random design.
Step 3: The Attachment Trick
Here's where the magic happens: layer each of the Whisper White cardstock pieces onto the Pool Party mats. Adhere each layer (large to small), being mindful that the images line up.
Step 4: Add Your Greeting and Embellish
Choose your greeting to finish the project and add embellishments to give it a little bling!
Be sure to hop along with the rest of the Totally Techniques Blog Hop team and see what the crew designed!
Have you tried the Triple Stamping Technique? Drop a comment below and share your favorite stamp sets you’ve used with this technique.
And if you're new to paper crafting techniques, don't worry – this is the a great technique to try!
Warmly,
Lynsay
![Pool Party Classic Stampin' Pad [ 147107 ]](https://assets1.tamsnetwork.com/images/EC042017NF/147107s.jpg "Pool Party Classic Stampin' Pad [ 147107 ]") | ![Pool Party 8-1/2" X 11" Cardstock [ 122924 ]](https://assets1.tamsnetwork.com/images/EC042017NF/122924s.jpg "Pool Party 8-1/2\" X 11\" Cardstock [ 122924 ]") | ||
![Timid Tiger Classic Stampin' Pad [ 165278 ]](https://assets1.tamsnetwork.com/images/EC042017NF/165278s.jpg "Timid Tiger Classic Stampin' Pad [ 165278 ]") | ![Pecan Pie Classic Stampin' Pad [ 161665 ]](https://assets1.tamsnetwork.com/images/EC042017NF/161665s.jpg "Pecan Pie Classic Stampin' Pad [ 161665 ]") | ![Soft Sea Foam Classic Stampin' Pad [ 147102 ]](https://assets1.tamsnetwork.com/images/EC042017NF/147102s.jpg "Soft Sea Foam Classic Stampin' Pad [ 147102 ]") | ![Tuxedo Black Memento Ink Pad [ 132708 ]](https://assets1.tamsnetwork.com/images/EC042017NF/132708s.jpg "Tuxedo Black Memento Ink Pad [ 132708 ]") |
![Paper Trimmer [ 152392 ]](https://assets1.tamsnetwork.com/images/EC042017NF/152392s.jpg "Paper Trimmer [ 152392 ]") | ![Traditional Sparkling Sequins [ 165875 ]](https://assets1.tamsnetwork.com/images/EC042017NF/165875s.jpg "Traditional Sparkling Sequins [ 165875 ]") | ![Stampin' Seal [ 152813 ]](https://assets1.tamsnetwork.com/images/EC042017NF/152813s.jpg "Stampin' Seal [ 152813 ]") |
![Beautiful Pumpkins Bundle (English) [ 166012 ]](https://assets1.tamsnetwork.com/images/EC042017NF/166012s.jpg "Beautiful Pumpkins Bundle (English) [ 166012 ]")
![Whisper White 8-1/2" X 11" Cardstock [ 100730 ]](https://assets1.tamsnetwork.com/images/EC042017NF/100730s.jpg "Whisper White 8-1/2\" X 11\" Cardstock [ 100730 ]")