Using Embossing Paste to Add Texture to Cards | Totally Techniques
Learn how simple it is to add texture with Embossing Paste!
Hello my friends! I'm Lynsay Mahon. My favourite way to make a “WOW” project is to add texture, and nothing says texture better than Embossing Paste!

Welcome to this month's Totally Techniques Blog Hop. Each month, our team shares hand-picked techniques and projects to help you make your next paper-crafted project. Each of our designers shares a handmade creation featuring the technique, along with ideas to inspire you! Today, we're playing with Embossing Paste to add texture to your projects!
Embossing Paste
You might be asking yourself…
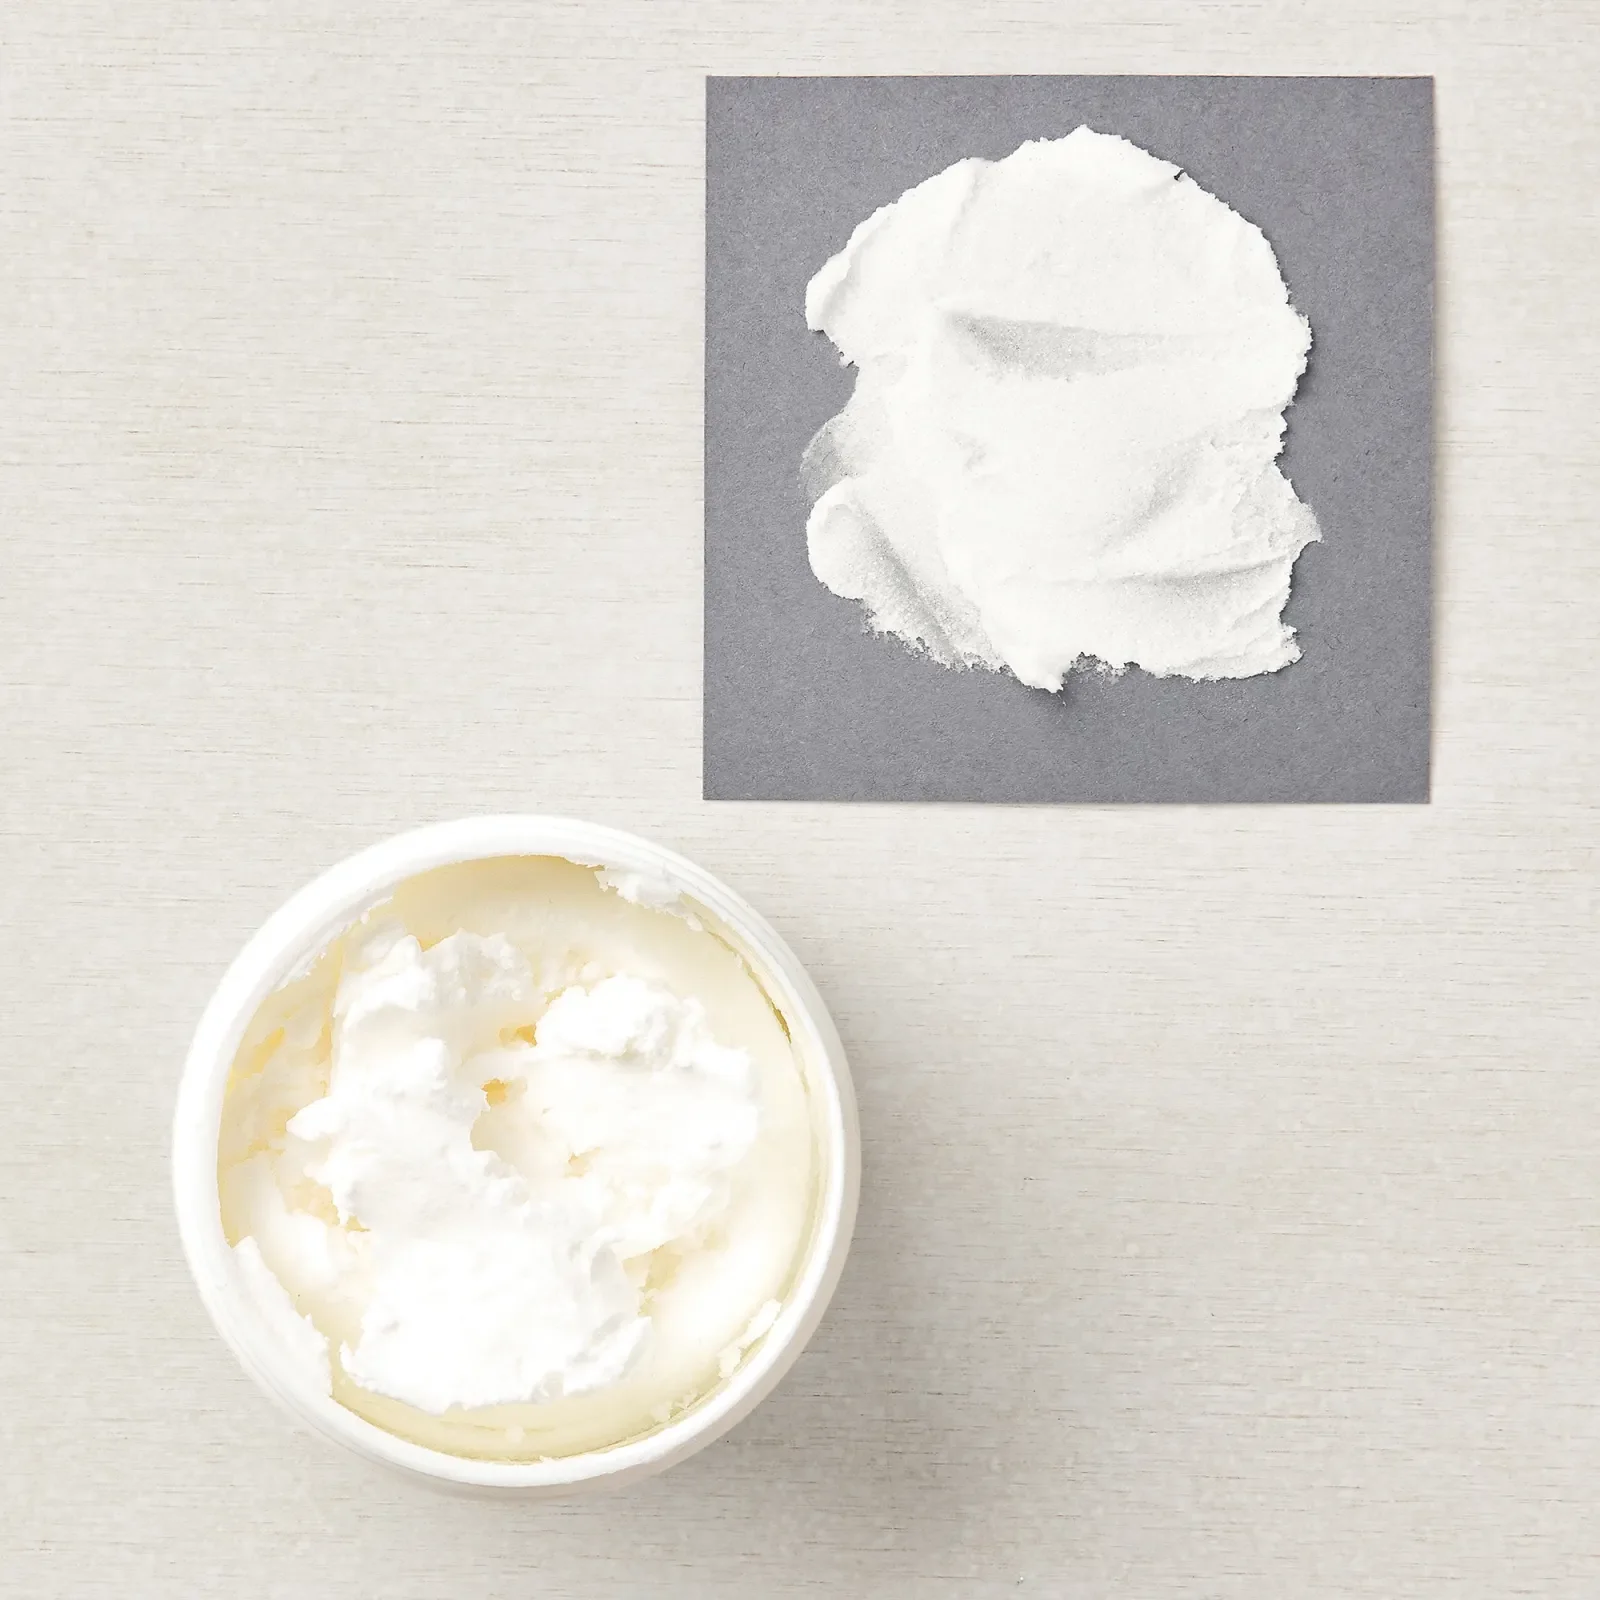
“What is Embossing Paste?”
Embossing Paste looks like icing and when applied to a project, dries within minutes to create beautiful height to your cards.
Before we jump into the how-to, here’s what you need to know to work with Embossing Paste:
There are two types of Embossing Paste by Stampin’ Up! - The regular Embossing Paste (141979) dries matte and the Shimmery Embossing Paste (1458645) dries with a subtle sparkle.
You can use any decorative mask, or make your own with your dies - No matter the theme of your card, adding that extra texture with masks (or free hand - think icing on a cake!) is going to elevate your design.
Palette Knives (142808) are inexpensive and easy to apply the paste - with three knives in the package to choose from, they give you the perfect options for adding the paste to your project.
Snowy Delights Decorative Masks and Embossing Paste
Here are Step-By-Step instructions to make this card:
Here's how to work with Embossing Paste:
Step 1: Cut Your Paper to Size
Cut White Velvet Specialty Paper (this adds even more texture) to:
3” x 4”
Cut Basic White Cardstock for layering and card bases:
3-1/8” x 4-1/8”
8-1/2” x 5-1/2”
1” x 4” (for punching greeting)
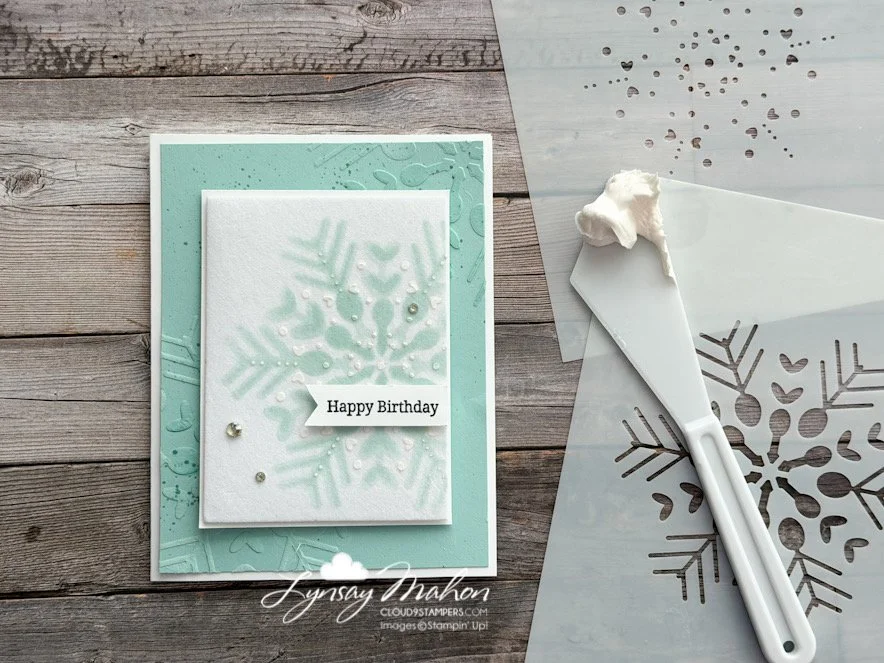
Step 2: Add Pool Party Ink to your Decorative Masks
Line up the Snowy Delights Decorative Masks over the Velvet Specialty Paper and use a Blending Brush to add multiple layers of ink to create the Pool Party snowflakes.
Step 3: The Embossing Paste Magic
Line up the most detailed layer of your Decorative Masks over your Pool Party Snowflakes. Use the wide Pallet Knife and scoop about 1 TBSP of Embossing Paste. Use the knife to apply paste over the mask until the paste has evenly covered the design. Remove the mask and set aside to dry (it takes about 5 minutes and can be sped up by using a Heat Tool). Be sure to immediately clean your mask and knife so that the paste doesn’t harden on your tools.
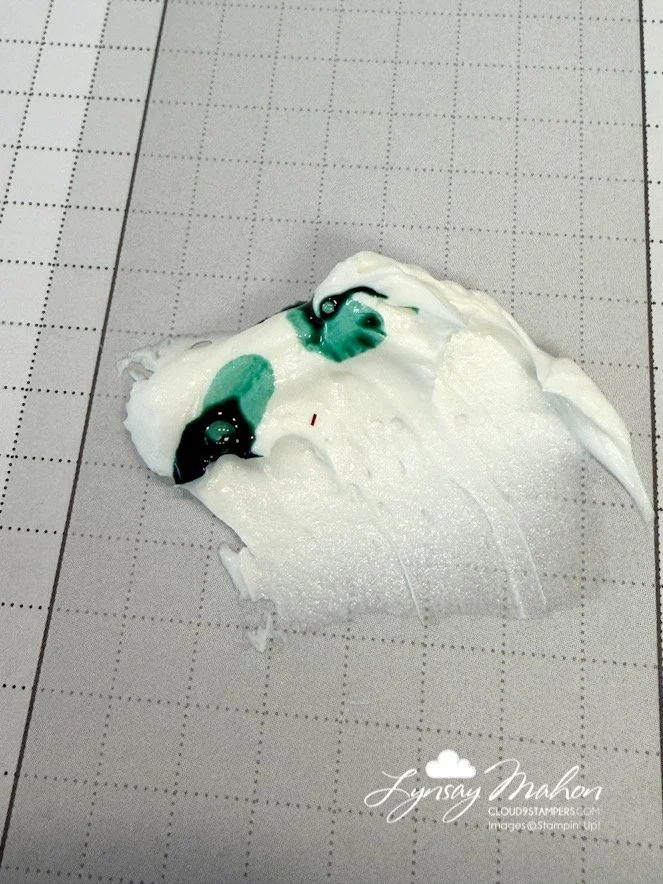
Add Ink
2-3 drops should be enough to make custom made paste
Mix!
Once your paste is uniform, it’s ready to apply!
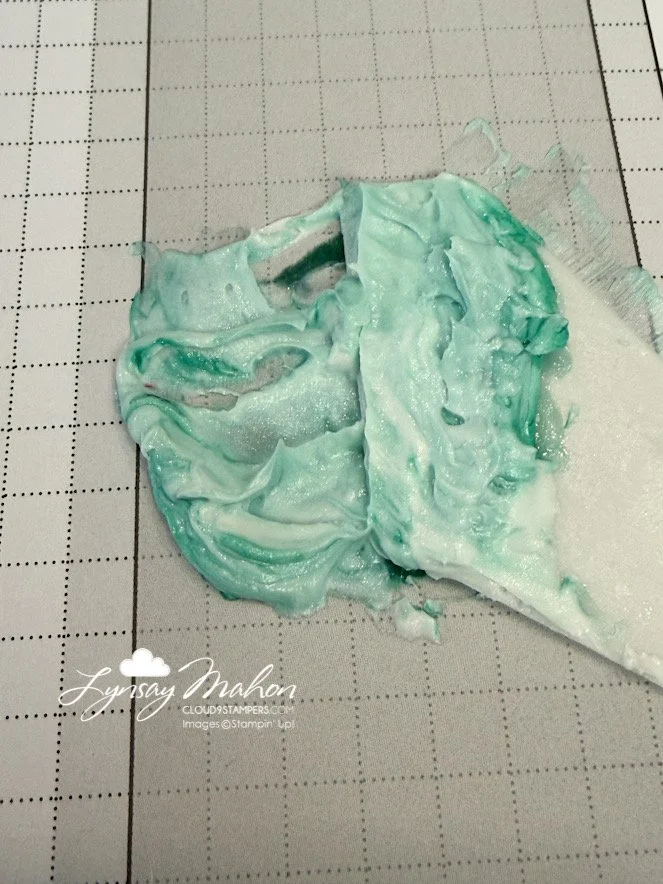
Step 4: Create Coloured Embossing Paste with Ink Refills
You can easily make any colour of Embossing Paste by adding a couple of drops of Ink Refills and mixing it into the paste. Use your Pallet Knife to scoop out a TBSP of paste and put onto a scrap paper. Add 2-3 drops of ink refill (I used Pool Party) and mix until the colour is uniform.
Step 5: Apply Coloured Paste
Add even more texture to the card front by applying tone-on-tone paste! I used my Pool Party paste and applied it over the snowflake mask to create this look.
Step 6: Assemble the Card and Embellish
This card is a stunning mix of subtle texture and layers. Finish it off with some beautiful rhinestones!
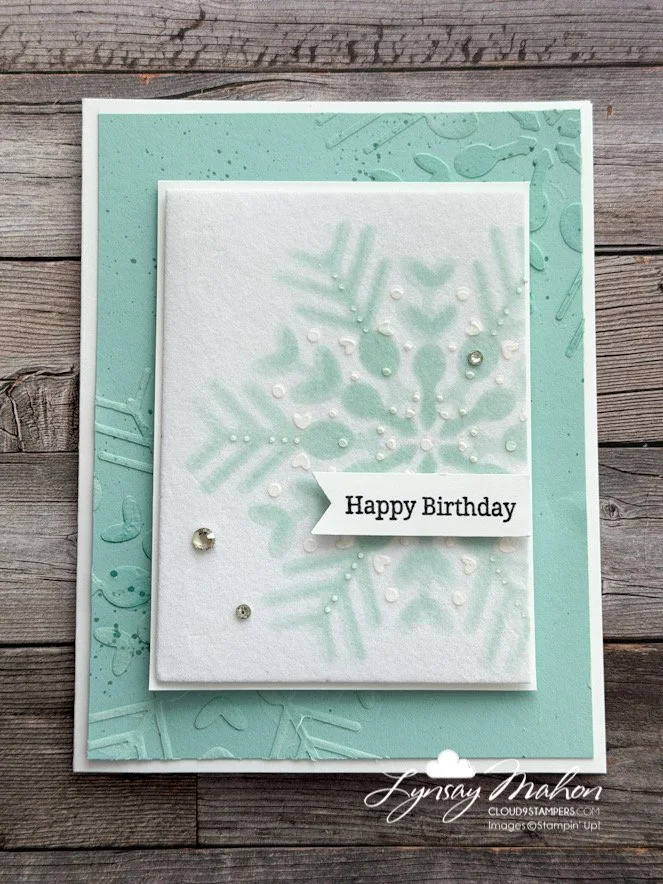

I love the subtle texture of adding embossing paste to Velvet Specialty Paper!
Be sure to hop along with the rest of the Totally Techniques Blog Hop team and see what the crew designed with Embossing Paste!
Have you worked with Embossing Paste? Drop a comment below and share! I’d love to know if you’ve tried it with ink refills before.
Happy Crafting,
Lynsay
![Snowy Wonder Bundle (English) [ 164125 ]](https://assets1.tamsnetwork.com/images/EC042017NF/164125s.jpg "Snowy Wonder Bundle (English) [ 164125 ]") | ![Embossing Paste [ 141979 ]](https://assets1.tamsnetwork.com/images/EC042017NF/141979s.jpg "Embossing Paste [ 141979 ]") | ![Palette Knives [ 142808 ]](https://assets1.tamsnetwork.com/images/EC042017NF/142808s.jpg "Palette Knives [ 142808 ]") | |
![Pool Party Classic Stampin' Pad [ 147107 ]](https://assets1.tamsnetwork.com/images/EC042017NF/147107s.jpg "Pool Party Classic Stampin' Pad [ 147107 ]") | ![Pool Party 8-1/2" X 11" Cardstock [ 122924 ]](https://assets1.tamsnetwork.com/images/EC042017NF/122924s.jpg "Pool Party 8-1/2\" X 11\" Cardstock [ 122924 ]") | ![Basic White 8 1/2" X 11" Cardstock [ 166780 ]](https://assets1.tamsnetwork.com/images/EC042017NF/166780s.jpg "Basic White 8 1/2\" X 11\" Cardstock [ 166780 ]") | |
![Stampin' Dimensionals [ 104430 ]](https://assets1.tamsnetwork.com/images/EC042017NF/104430s.jpg "Stampin' Dimensionals [ 104430 ]") | ![Tuxedo Black Memento Ink Pad [ 132708 ]](https://assets1.tamsnetwork.com/images/EC042017NF/132708s.jpg "Tuxedo Black Memento Ink Pad [ 132708 ]") | ![Banner Sayings Bundle (English) [ 167051 ]](https://assets1.tamsnetwork.com/images/EC042017NF/167051s.jpg "Banner Sayings Bundle (English) [ 167051 ]") | |
![Stampin' Seal [ 152813 ]](https://assets1.tamsnetwork.com/images/EC042017NF/152813s.jpg "Stampin' Seal [ 152813 ]") |
![All Season Velvet 12" X 12" (30.5 X 30.5 Cm) Specialty Paper [ 166063 ]](https://assets1.tamsnetwork.com/images/EC042017NF/166063s.jpg "All Season Velvet 12\" X 12\" (30.5 X 30.5 Cm) Specialty Paper [ 166063 ]")
![Pool Party Classic Stampin' Ink Refill [ 122933 ]](https://assets1.tamsnetwork.com/images/EC042017NF/122933s.jpg "Pool Party Classic Stampin' Ink Refill [ 122933 ]")
![Basic White 8 1/2" X 11" Thick Cardstock [ 159229 ]](https://assets1.tamsnetwork.com/images/EC042017NF/159229s.jpg "Basic White 8 1/2\" X 11\" Thick Cardstock [ 159229 ]")